Pages

Showing posts with label yellow. Show all posts

Sunday, February 9, 2014

Como Hacer un Minion con un Bote de Plastico.

Hola a todos!!!

Ayer llegó mi hija de la escuela con la novedad de que les habían enseñado como hacer minions con botellas de plástico. Entonces llegó pidiendome que hicieramos la actividad en casa y aquí se las muestro.
Ademas de ser muy fácil esta actividad te puede servir para alguna fiesta infantil, decorando de ésta manera las bebidas de los pequeños invitados.
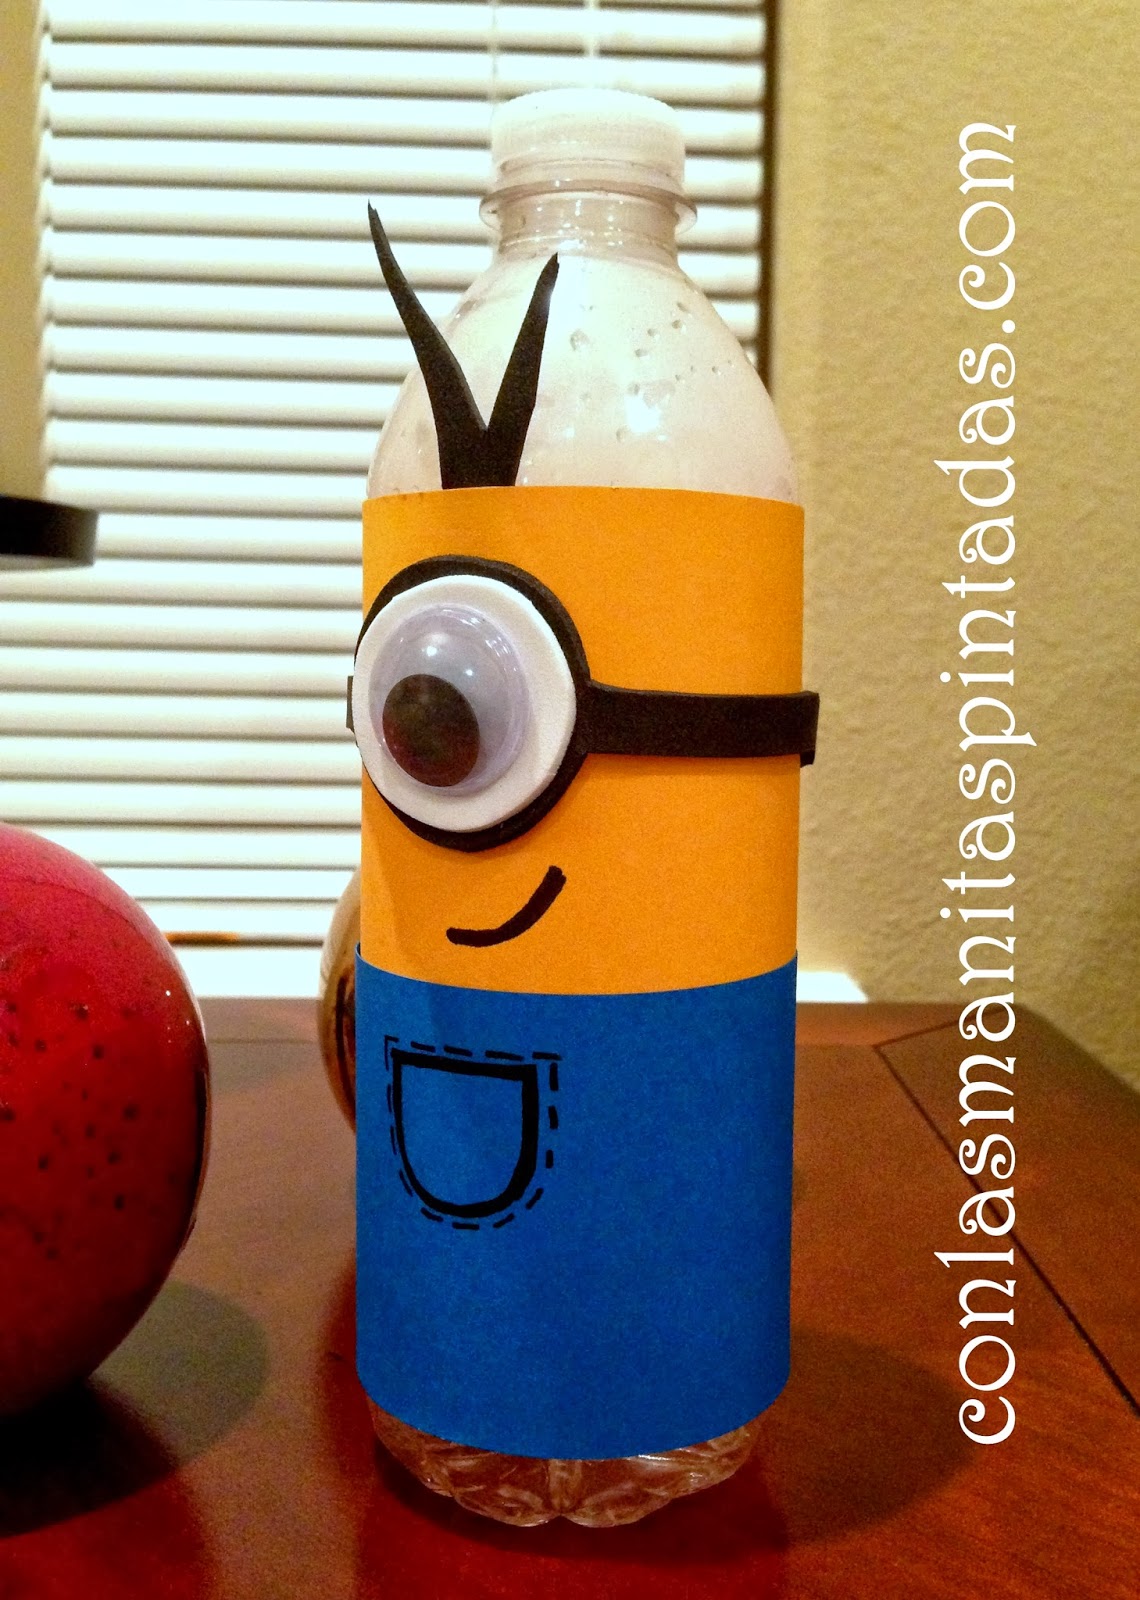
Para esta actividad vamos a necesitar lo siguiente:

Materiales:
  • Botellas de plastico
  • Tijeras
  • Marcador indeleble negro
  • Cartulina amarilla y azul
  • Pistola de silicón caliente
  • Regla
  • Lápiz
  • Goma EVA negra y blanca
  • 2 ojos móviles


  • Primero vamos a trazar y recortar una tira de la altura de la botella de plástico (solo la altura hasta donde empieza el cuello de la botella) con la cartulina amarilla.
  • Despues,vamos a trazar y recortar otra tira con la cartulina azul (esta tira va a medir la mitad de lo alto de la tira de la cartulina amarilla).


  • Vamos a pegar primero la cartulina amarilla a la botella usando el silicón caliente (como se muestra en la foto).


  • Ahora le llego el turno a la tira azul (pantalones del minion). Esta tira la vamos a pegar arriba de la tira amarilla.


  • En la goma EVA (foamy) vamos a trazar y recortar los lentes del minion (en este caso van a ser unos lentes de un solo ojo), luego vamos a trazar y recortar un circulo un poco mas pequeño (el cual será el ojo del minion).


  • Ahora vamos a pegar todas las piezas de goma EVA para formar el lente de nuestro minion.


  • Con el silicón caliente, vamos a pegar el lente en la parte amarilla del minion.


  • Y por ultimo le decoramos una hermosa sonrisa y una linda bolsita en sus pantalones. Y recuerda ponerle unos cabellos con la goma EVA (foamy) como lo hice yo.


  • Aqui les comparto el minion que hizo mi pequeña hija, ella le decoró el pantalón con corazones. Lindo, verdad!!!


Gracias por visitar mi blog y hasta la próxima!!!

Monday, January 13, 2014

How to make a lion with EVA foam - foamy -

Hi, everyone!!!


This time we will make a craft where we will include the king of the jungle: the lion.
Of course our lion will not cause us fear but rather provoke us tenderness.


For this activity we will require the following:

Materials:
  • EVA foam (yellow, black, and orange)
  • Scissors
  • Hot glue gun
  • Pencil
  • Permanent marker (black, yellow and brown)
  • Bond paper (white)
  • Acrylic paint (white)
  • Fine-tipped paintbrush


  • Let's first draw and cut the lion of our choice in the bond paper, so we will get our templates.


  • Next, we will draw and cut out templates in EVA foam, (the lion's body and face  in yellow, and tail and mane in orange) 


  • When we have all the pieces cut out, we will add more detail going around the edge of them with permanent marker and fading with a finger or a cotton swab.


  • When we have finished outlining all parts of our lion, we will put all the pieces together with hot glue.
  • Now, let's glue the ball of the tail, the eyes and we will paint a beautiful smile, plus add some nice freckles.


  • Finally we will give some details adding light with white acrylic paint.


  • And presto!! We have the king of the jungle finished decorating some corner of our home.


Thanks for reading my blog and until next time!!!


Monday, January 6, 2014

How to make a beautiful bee with EVA foam

Hi, everyone!!!


Beautiful are the days where spring blooms and fields are full of flowers, and how could we forget the best friends of flowers: the cute little bees. 


This time we will learn how to make a cute bee with EVA foam. This way, we can feel the spring inside our home all year long.

Materials:

  • EVA foam (baby blue, black and yellow)
  • 2 pom poms
  • 2 chenille stripes.
  • Scissors
  • Hot glue gun
  • White paper (to trace the templates)
  • Pencil
  • Permanent marker (black)
  • Fine-tipped paintbrush
  • Acrylic paint (white)
  • Pink blush

How to do it:

  • Let us first trace and cut the bee of our choice in the white paper. So we get our templates.

  • After this you need to trace and cut out the bee templates in the corresponding EVA foam color, as shown in the picture. Remember to cut 2 eyes and the mouth of the bee. 


  • Make the antennas with the 2 stripes of chenille, to achieve this you only need to screw the 2 stripes of chenille and then make the shape of each antenna with your fingers.
  • At the tip of each antenna you will paste a pompom
  • Now, let's put all the pieces of the bee together with hot glue.
  • You can add more detail adding a beautiful cheeks with pink blush, a cute nose and funny freckles!!!


Finally if you want your little bee to be more detailed  you can add some details with white acrylic paint, like I did.

And presto, we finished our bee! Ready to keep the spring all year long inside our home!

Thanks for reading my blog, and until next time!

Sunday, January 5, 2014

Como hacer una abeja con goma EVA

Hola mis amigos:

Hermosos son los dias de primavera donde todos los campos florecen y se llenas de flores, y como olvidar a las amigas inseparables de las flores: las lindas abejitas.


En esta ocasion vamos a aprender como hacer una linda abeja de goma EVA. De este modo, sentiremos la primavera dentro de nuestro hogar todo el año.

Materiales:

  • Goma EVA ( celeste, negra y amarilla)
  • 2 pompones negros.
  • 2 tiritas de chenille ( una negra y otra amarilla)
  • Tijeras  
  • Pistola de silicon caliente
  • Papel blanco ( para trazar nuestras plantillas)
  • Lapiz
  • Marcador indeleble negro
  • Pincel de punta fina
  • Pintura acrilica color blanco
  • Rubor rosa
Elaboracion:

  • Trazar y recortar la abejita de nuestra eleccion en el papel blanco, de esta manera vamos a obtener nuestras plantillas.


  • Trazar y recortar nuestras plantillas en la goma EVA en el color correspondiente, como lo muestra la fotografia. Recuerda recortar los 2 ojitos y la boca de la abeja).


  • Hacer las antenitas con las 2 tiras de chenille, para lograr esto solo necesitamos enroscar las 2 tiras y hacer la forma de la antenita con nuestras manos.
  • En la punta de cada antena vamos a pegar un pompon.
  • Ahora vamos a unir todas las piezas de la abejita con silicon caliente.
  • Pintamos las mejillas con el rubor rosa, y decoramos con una hermosa nariz y unas lindas pequitas!


Por ultimo si deseas que tu abejita este mas detallada le puedes agregar unos detalles con la pintura acrilica blanca, como lo hice yo.

Y listo, terminamos nuestra abeja!!! Lista para mantener la primavera el año entero en nuestro hogar!

Gracias por leer mi blog y hasta la proxima!!!


Thursday, January 2, 2014

How to make a chick with construction paper

Today you will learn how to make a cute chick with construction paper.


It is a very simple and fun craft for our little ones. With this activity they will learn and have fun at the same time.

It is perfect to decorate their bedrooms or to comply with any homework. It can also serve as a birthday invitation or as decoration in any children's party. This is a great project for everyone in the family, or school group.

Supplies needed
·   Construction paper (red, yellow and black
·        Scissor 
·        Color pencils (red and orange)
·        Hot glue gun


How to make it:

  • Trace every pattern on white paper and cut out all the pieces. Then trace every piece on its appropriate construction paper color. (Body, beak, legs, eyes and crest).


  •  If you want you can highlight all the parts of the chick’s body with  the colored pencils (red and orange), coloring the contour of each piece.


  •  When you have all the parts ready, the next step is to glue all the pieces together with hot glue.


  • To give a 3D effect put some small pieces of paper before gluing the wings of the chick.


  •   The next step is to glue the beak, eyes, legs and crest of the chick.

  •    Now add some details to our craft using some white paint as is show in the picture.

 And that it, you’re done!!!! Thanks for whatch my post and see you next time!!!!


Wednesday, January 1, 2014

Como hacer un pollito con cartulina


Hoy vamos a aprender como hacer un lindo pollito con cartulina amarilla.


Es una manualidad muy simple y divertida para que los pequeños de la casa aprendan y se diviertan al mismo tiempo.
Ideal para decorar sus recamaras o para cumplir con alguna tarea escolar. Tambien nos podria servir como invitacion de cumpleaños o como decoracion en alguna reunion infantil.

Materiales:
  • Cartulina color amarillo, roja (o naranja) y negra
  • Tijeras
  • Lapices de colores (naranja y rojo)
  • Resistol o silicon
Preparacion paso a paso:
  • Trazar el molde del pollito en un papel blanco y recortar. Trazar las plantillas en la cartulina correspondiente con cada parte del cuerpo de nuestro pollito, (cuerpo, pico, patas, cresta y ojitos).

  • Si deseas puedes resaltar todas las piezas del cuerpo del pollito con los lapices de colores (rojo y naranja), coloreando el contorno de cada pieza.

  • Ya que tengas todas las piezas listas, el siguiente paso es unir todas las piezas con resistol o silicon (en esta ocasion yo use silicon).

  • Para darle un efecto de 3D puse unos pequeños pedazos de papel antes de pegar las alitas del pollito.
  • Procede a pegar pico, ojitos, patas y cresta.
  • Por ultimo si deseas que este mas detallado puedes decorarlo con pintura blanca como se muestra en la foto. 

Asi es como luce nuestro pollito ya terminado y listo para decorar algun rincon de nuestro hogar o en la escuela de tus hijos.

Gracias y hasta la proxima!!!!


Friday, December 27, 2013

How to make a sun with a paper plate

Hi friends,
This time we will make a sun with a paper plate.


One advantage of this activity is that it is very simple and our little ones can participate in the development of our sun , besides that is a very economic activity.

Supplies needed:
* A Paper Plate
* Yellow paint
* Brush
* Yellow construction paper
* Pencil
* Scissors
* Googly eyes
* Black marker
* Glue
* Hot glue gun

How to make it:
1.- Paint the paper plate with yellow paint and let it dry .


2.- Draw and cut the rays of sunlight of our sun on a yellow construction paper . I cut two different sizes of beams, one large and one small.

3.- When you finish cutting all the rays and the yellow paint which you used to paint the sun has dried, we proceed to build our sun.

4.- You will then paste the rays of our sun to the back of our plate, first placing the big rays with the same distance between eachother.


5.- Now you will paste the smaller beams to the plate, which will be in the spaces left between the large rays.


6.- Finally we will form our sun face with googly eyes and a beautiful smile.


If you want you can add some nice red cheeks using a pink colored powder.

Sunday, December 22, 2013

Como hacer un sol con un plato desechable.

Hola amigos,
En esta ocasión vamos a realizar un sol con un plato de papel desechable.


Una de las ventajas de esta actividad es que es muy sencilla y pueden participar nuestros pequeñines en la elaboración de nuestro sol, ademas de ser una actividad de muy bajo costo.

Materiales:
* Plato desechable de papel.
* Pintura de color amarillo.
* Pincel.
* Cartulina de color amarillo para los rayos de nuestro "amiguito".
* Lápiz.
* Tijeras.
* Dos ojos grandes móviles.
* Marcador negro.
* Pegamento.
* Pistola de silicon.

Elaboración:
1.- Pintar el plato de papel con la pintura de color amarillo y dejarlo secar.


2.- Trazar y cortar los rayos de nuestro "amiguito" en la cartulina amarilla. Yo corte dos medidas diferentes de rayos, una grande y una mas pequeña.

3.- Ya que tengamos todos los rayos cortados y la pintura amarilla con la que pintaste el sol se haya secado, vamos a proceder a armar nuestro sol.


4.-  Pegaremos los rayos de nuestro sol por la parte posterior de nuestro plato, pegando primero los rayos grandes con la misma distancia de separación.

5.- Ahora llego el turno de pegar nuestros rayos mas pequeños, los cuales van a quedar en los espacios que quedaron entre los rayos grandes.


6.- Por ultimo formaremos la cara de nuestro sol con los ojos móviles y le pintaremos una hermosa sonrisa.


Si deseas puedes añadir unas lindas mejillas sonrojadas utilizando un color en polvo rosa.