Pages

Sunday, February 9, 2014

Como Hacer un Minion con un Bote de Plastico.

Hola a todos!!!

Ayer llegó mi hija de la escuela con la novedad de que les habían enseñado como hacer minions con botellas de plástico. Entonces llegó pidiendome que hicieramos la actividad en casa y aquí se las muestro.
Ademas de ser muy fácil esta actividad te puede servir para alguna fiesta infantil, decorando de ésta manera las bebidas de los pequeños invitados.

Para esta actividad vamos a necesitar lo siguiente:

Materiales:
  • Botellas de plastico
  • Tijeras
  • Marcador indeleble negro
  • Cartulina amarilla y azul
  • Pistola de silicón caliente
  • Regla
  • Lápiz
  • Goma EVA negra y blanca
  • 2 ojos móviles


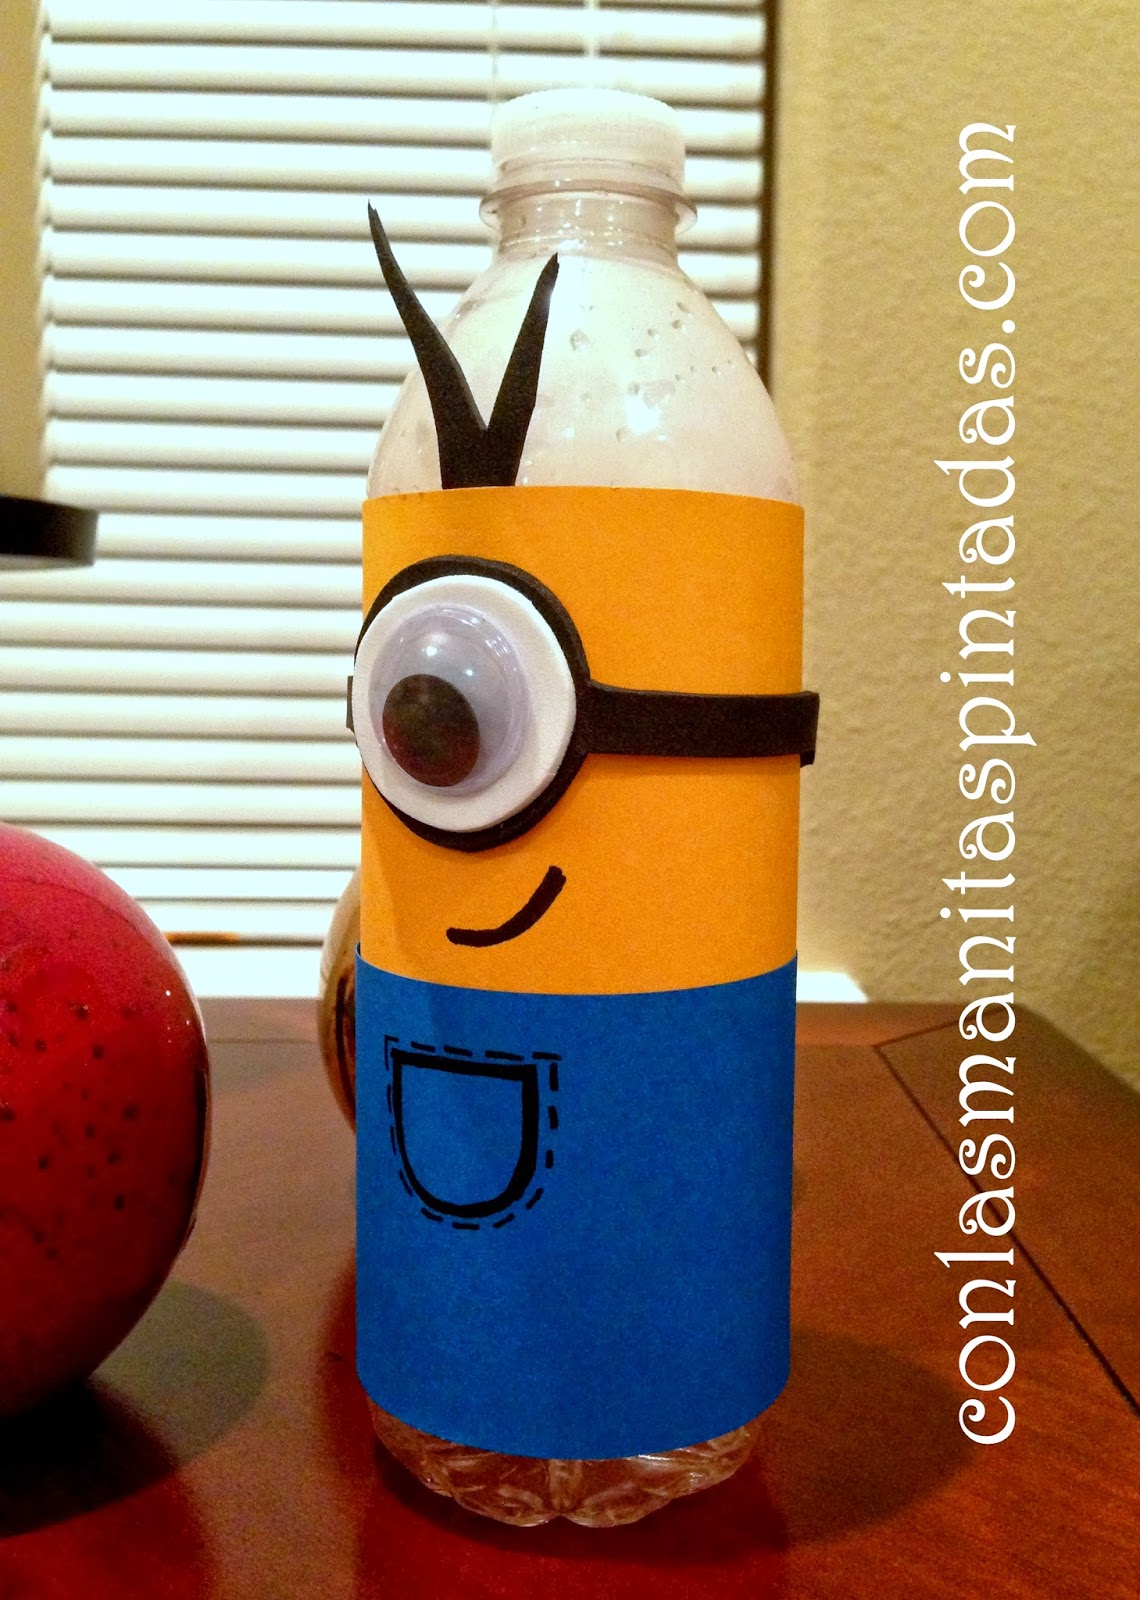
  • Primero vamos a trazar y recortar una tira de la altura de la botella de plástico (solo la altura hasta donde empieza el cuello de la botella) con la cartulina amarilla.
  • Despues,vamos a trazar y recortar otra tira con la cartulina azul (esta tira va a medir la mitad de lo alto de la tira de la cartulina amarilla).


  • Vamos a pegar primero la cartulina amarilla a la botella usando el silicón caliente (como se muestra en la foto).


  • Ahora le llego el turno a la tira azul (pantalones del minion). Esta tira la vamos a pegar arriba de la tira amarilla.


  • En la goma EVA (foamy) vamos a trazar y recortar los lentes del minion (en este caso van a ser unos lentes de un solo ojo), luego vamos a trazar y recortar un circulo un poco mas pequeño (el cual será el ojo del minion).


  • Ahora vamos a pegar todas las piezas de goma EVA para formar el lente de nuestro minion.


  • Con el silicón caliente, vamos a pegar el lente en la parte amarilla del minion.


  • Y por ultimo le decoramos una hermosa sonrisa y una linda bolsita en sus pantalones. Y recuerda ponerle unos cabellos con la goma EVA (foamy) como lo hice yo.


  • Aqui les comparto el minion que hizo mi pequeña hija, ella le decoró el pantalón con corazones. Lindo, verdad!!!


Gracias por visitar mi blog y hasta la próxima!!!

Como Hacer una Flor con un Plato de Papel Desechable

Hola a todos!!!

A pesar de que esta bastante frio,en esta ocasión vamos a hacer una actividad de primavera: una hermosa flor con unos platos de papel y mucha imaginación.

Con esta actividad nuestros hijos desarrollarán su habilidad para cortar con tijeras.


Para esta actividad vamos a necesitar lo siguiente:

Materiales:

  • Tijeras 
  • Lápiz
  • Plato grande de papel (rojo)
  • 3 platos chicos de papel (verde)
  • Pompones amarillos
  • Pistola de silicón caliente
  • Regla
Paso a paso.
  • Primero vamos a  trazar en la parte de atrás de nuestro plato grande (rojo) lineas con la misma separación entre ellas. Las lineas nos van a servir como guía para los pétalos de nuestra flor. 


  • Ahora vamos a cortar uno a uno los petalos de la flor como se muestra en la foto.


  • Asi es como va a lucir nuestro plato con todos los petalos ya recortados.


  • Ahora vamos a agregar el centro de la flor, el cual va a ser el plato de papel chico (verde), pegandolo con el silicón caliente.


  • Para el centro de la flor vamos a usar los pompones como decoración, pero recuerda que puedes usar lo que tengas en casa o lo que tu imaginación te diga (botones, pedacitos de papel, marcadores, etc.)


  • Para hacer las hojas de nuestra flor vamos a necesitar 2 platos chicos de papel (también puedes usar cualquier cartulina verde que tengas en casa). Vamos a trazar y recortar 2 hojas como se muestra en la foto.


  • Y las vamos a pegar en la parte de atrás de nuestro plato con el silicón caliente.


  • Y listo!!! tenemos una hermosa flor roja lista para decorar cualquier rincón de nuestro hogar.


Gracias por visitar mi blog y hasta la próxima!!!


Wednesday, January 29, 2014

Arrow Pencil & Heart for Valentine's Day

Hi everyone!!!

This time we'll make a super-easy craft which can bail out any dad or mom on Valentine's Day.
It's so easy because you only need to print a heart template with the phrase you want to express what you feel for a special person.


For this activity you'll need the following:

Materials:
  • Printer
  • Construction paper (red, pink, purple or any colour you want)
  • Valentine pencils
  • Hole punch
  • Scissors

How to do it:
  • First, we need to print the heart template with an inside Valentine's phrase. (ex: "Thanks for being my friend")


  • Then we need to cut out the hearts and we'll make 2 holes with the hole punch (as shown in the picture). In these 2 holes we'll introduce the pencil (arrow) of our heart.

  • And remember!!! Don't forget to write the name's person on the back of the heart before you put the pencil.


  • And voila!!! We make a cute and easy present to share on Valentine's Day.


Thanks for reading my blog from the bottom of my heart!!! And until next time!!!

How to make a Paper Plate Monster


Hi,everyone!!!

Today we will do an activity that little ones in home will love very much!
We'll craft a monster with a paper plate.

With this activity our children will develop their ability to cut and paint with brush.


  • For this activity we'll need the following:
Materials:
  • Paper plate 
  • 6 chenille stripes (orange)
  • Acrylic paint (blue)
  • Bond paper
  • Scissors
  • Pencil
  • Paintbrush
  • Permanent marker
  • EVA foam (purple, white & black) 
  • Hot glue gun

How to do it:
  • First we'll cut the plate in half. 
  • Next, we'll trace on the bond paper, the horns, smile & eyes of our monster. Doing this we'll get our templates.


  • We'll paint the paper plate with the acrylic paint (blue or any colour you like). Other option is to use a blue paper plate.


  • Now, we will trace and cut out on the EVA foam (foamy) the eyes (as it is a monster, it is going to need 3 eyes) and the 2 horns.
  • With chenille strips we'll make our friend's hair. For this we'll screw each chenille strip in a pencil.


  • When we have all the pieces cut out, we'll begin to glue them all together with the hot glue.
  • First we glue the monster's hair and then the horns.


  • Then we glue the eyes,and we add some little teeth. Also we draw a beautiful smile. 
  • We can add some details to the horns with the permanent marker, (as shown in the picture). 


And voila!!! We have finished a cute little blue monster!!!

Here I show my daughter's monster (which she named MOSI) I hope you like it.


Thanks for reading my blog and until next time!!!

Friday, January 24, 2014

Corazón de Cartulina con Lápiz para Día de los Enamorados * San Valentín*

Hola a todos!!!
En esta ocasion vamos a hacer una manualidad super sencilla la cual puede sacar de apuros a culquier papá o mamá en el Día de los Enamorados o Día de San Valentín.

Es tan facil porque solo necesitas imprimir una plantilla de corazón con la frase que desees y con la cual vas a expresar todo lo que sientes por una persona especial.


Para esta actividad vas a necesitar lo siguiente:

Materiales:

  • Impresora
  • Cartulina rosa, roja o morada.
  • Lapices decorados de San Valentín
  • Perforadora
  • Tijeras


  • Primero vas a imprimir la plantilla de corazón de tu elección con la frase adentro de ella. (ejemplo: "Gracias por tu amistad")


  • Luego vas a recortar los corazones y les vas a hacer 2 perforaciones con el perforador, las cuales te van a servir para introducir el lápiz (flecha) en el corazón.

  • Y recuerda!!! No olvides escribir la dedicatoria en el reverso de la tarjetita de corazón antes de poner el lápiz.


  • Y listo!!!! Ya tenemos un lindo detalle para regalar este Día de los Enamorados.


Gracias por visitar mi blog y hasta la próxima!!! Besos!!!


Wednesday, January 22, 2014

How to Make Treat Bag Toppers for Valentine's Day

Hi, everyone!!!

Today we are going to make some treat bag toppers. For Valentine's Day I think it is fun to create our own Valentine's.
This is a fantastic idea as a Valentine's Day present and a very easy craft to make, in which our little ones can help and have fun at the same time.


For this craft we will need the following.

Materials:
  • Glue 
  • Scissors
  • Cardboard (pink & red)
  • Pencil
  • Hot glue gun
  • Stickers
  • Treats for bags
  • Baggies
  • Printed tags onto white paper (example: "Thanks for be my friend")

How to do it:
  • Let's first draw and cut out a rectangle on the pink cardboard (which has the same width as the plastic bag, and twice the height we want to give to the bag topper)
  • Now, fold bag toppers in half.
  • We also print and cut out the phrase we chose to thank the person we're going to give the treat bag.

  • Now, we'll staple the bag topper on the plastic bag that is already filled with your favorite candy.
  • The next step is to glue the white paper (with the printed phrase) on the bag topper.  (as shown in the picture).

  • Finally, we'll decorate the bag topper with stickers or any detail that we want.
  • If you want to achieve a 3D effect, glue a little piece of foam before placing the stickers to emphasize every detail.
And presto!!! We have a beautiful and sweet detail to sweeten the day to any friend or classmate.

Note: If you don't have a printer at hand, don't worry! You can decorate these bag toppers with only the stickers and put your name on the back and to whom it is addressed. (as I show you in the picture).


I send sweet kisses!
Thanks for read my blog and until next time!

Saturday, January 18, 2014

Como Hacer un Monstruo con un Plato de Papel

Hola a todos!!!
Hoy vamos a hacer una actividad que les va a gustar mucho a los pequeñines del hogar!!!
Vamos a elaborar un monstruo con un plato de papel.

Con esta actividad nuestros hijos van a desarrollar su habilidad para recortar y para pintar con pincel.


  • Para esta actividad vamos a necesitar lo siguiente:
Materiales:
  • Plato de papel desechable
  • 6 tiritas de chenille color naranja
  • Pintura acrilica azul
  • Papel bond blanco 
  • Tijeras
  • Lapiz
  • Pincel
  • Marcador indeleble
  • Goma EVA (foamy) morado, blanco y negro
  • Pistola de silicon caliente
Procedimiento:

  • Primero vamos a cortar el plato de papel a la mitad.
  • Despues vamos a sacar los moldes en el papel blanco de los cuernos y ojos de nuestro monstruo.


  • Vamos a pintar nuestro plato con la pintura acrilica azul. (otra opcion es usar un plato de color azul)


  • Vamos a trazar y recortar en la goma EVA los ojos (como es un monstruo vamos a necesitar 3) y los cuernos.
  • Tambien vamos a enroscar los chenilles naranjas con la ayuda de un lapiz. Estos van a ser el cabello de nuestro "amiguito".


  • Ya que tengamos todas las piezas listas, vamos a comenzar a pegarlas con el silicon caliente.
  • Primero pegamos el cabello y los cuernitos.


  • Luego pegamos los ojitos, lo decoramos con una linda sonrisa y le agregamos unos lindos dientitos. 
  • Decoramos los cuernos con el marcador indeleble (como se muestra en la fotografia).  


Y listo!!! Tenemos terminado un lindo monstruo azul!!!

Aqui les comparto el monstruo de mi hija, (al cual le puso el nombre de MOSI). Espero les guste.


Gracias por leer mi blog y hasta la proxima!!!


How to Make Valentine's Cards

Hello everyone!

Soon it will be February and therefore Valentine's Day.
And a good option is to give away little cards as a sign of our love for others.
This time we will make our own cards in which can participate our little ones.


For this activity we will need the following:

Materials:

  • Construction paper (red & pink)
  • White paper (bond)
  • Stickers (or any embellishment we have at home)
  • Hot glue gun
  • Pencil
  • Ruler
  • Glue or glue stick
  • Scissors

How to do it:

  • First thing we need to do is print any image we like on bond paper. (I printed the phrase "Happy Valentine's Day", but can be whatever you like it more).

  • We will draw and cut a rectangle on the construction paper (pink or red)  with a card measures. (I cut different sizes of cards. 4 x 6, 3 x 5, & 3 x 3).But this depends on the size you want your cards to be. 
  • You're going to cut the phrases you printed on the bond paper, (as shown in the picture).

  • Now we will fold in half the construction paper to make our Valentine's card.
  • Then, we'll glue the white paper (with the printed phrase) on our card.

  • Then we'll start decorating our card with stickers or any paper embellishment that we find at home. I used a paper trim that I had bought last year at the dollar store.

  •  For the stickers to have a 3D effect, you can put a little piece of foamy before you attach the sticker to the card.

  • And presto! When you finish adding all the details you want, you'll have a beautiful Valentine's card!
  • Here I leave other cards that my little daughter and I made, to her classmates and the teacher. 
  • And remember!!! The imagination is endless; you just have to dare to create a new project!!!


Happy Valentine's Day in company of your loved ones!
Kisses and more kisses from Julieta!!!

Thanks for visiting my blog and until next time!